End of season rifle care and inspection

Another season has been and gone and in these unprecedented times when we are all being very much restricted in terms of travel, it’s the perfect opportunity to ensure that we have our equipment ready for next season. One thing is certain, when the restrictions are removed and we can get back out doing what we love, we want our rifle and all our kit to be performing at its best. This end of season rifle care and inspection guide explains how. 

This requires a bit of work on our part before we put the rifles into hibernation. We must ensure that the rifle hasn’t suffered any unseen damage during the season, maybe a hairline crack in a stock or a scratch on the metal where protective coatings may have been compromised. These are a few of the small things that we want to address now, and not the night before our first planned trip of the new season.

Safety first

Ensure that you’ve got a clear work area, and that any ammunition is securely locked away. This cannot be over stressed – there is no excuse, ever, for ammunition to be present when a firearm is being cleaned. 

The bolt will of course have been removed from the rifle and is being stored separately. We do not need the bolt at this time. Also, ensure that the magazine has been removed from the rifle and that it does not contain any rounds.

If the rifle is of a floorplate design, open the floorplate to make absolutely certain that there are no rounds lurking in the depths of the action. Take a look down the barrel from the chamber end of the rifle to ensure that (a) there are no rounds in the chamber, and (b) there is nothing restricting the bore.

Checking the stock

When all the safety checks have been carried out, have a look at the rifle. No, have a close look at the rifle.

Recoil pad

Start at the recoil pad, inspecting it for movement and degradation. If the pad is rubber, it may start to crumble over time and may need replaced. If this is something that you’re not confident of tackling yourself, it is normally a relatively cheap job to have carried out by your local gunsmith.

Rear sling swivel

Check the rear sling swivel for damage and wear, and look for splits in the wood around the area where it screws into the stock. Make sure the sling is free of damage. If in any doubt, replace the sling – better to spend £30 now than have £3,000 worth of rifle and scope falling to the ground.

Pistol grip

Pay particular attention to the pistol grip area in the case of a rifle with a wooden stock, looking for hair line cracks running across the grip. Grip the fore end and cheekpiece in each hand and gently twist in opposite directions, looking for any cracks opening in the area of the pistol grip. This is the area of a wooden stock most susceptible to splits and cracks.

Chequering

Have a look at the chequering, it should ideally be sharp and free from contamination. Dried blood and mud do nothing for the grip on a wet and rainy day in the field. The chequering can be cleaned with a stiff toothbrush or nylon bristle brush followed by a cocktail stick to dislodge any stubborn debris. A phosphor-bronze or brass brush will really scratch the polish  so be careful when using these. 

Trigger guard

Moving on to the trigger guard area, some rifles now come with polymer trigger guards and magazine housings. These should be checked for damage and burrs. Small burrs on these can be easily removed with careful use of a small needle file or a razor blade. If the trigger guard is of the more common metal type, a few strokes with a small carborundum stone will normally suffice.

Areas that have been worn back to shiny metal or scuffed can be dealt with on a steel guard with one of the many bluing ‘touch up’ pens or liquids, available from your local dealer. This will assist to a certain extent with protection from the elements in the future, and should lessen the chance of corrosion setting in.

The fore end

The fore end should be checked for damage, including gouges in the wood caused by hastily resting the rifle on a firm surface for a shot. Most can be treated with a damp towel laid over the damaged area and the tip of a hot smoothing iron set on the damaged area. This creates steam, which enters the wood and swells the damaged fibres, thus making for a more successful repair.

Some sanding and refinishing may be required in more extreme cases. Care should be taken when carrying out such a repair to ensure that the stock is not scorched. This can be done by moving the towel to a fresh damp section. Check the front sling swivel and sling as per the rear one.

The stock

The final treatment for the stock, if is oil finished, is a small amount of boiled linseed oil, or ‘Tru-oil’ rubbed into it’s surface. It is very much a case of less is more with stock care, and a few small drips of oil should be enough for each side of the stock. In the case of ‘Tru-oil’, follow the manufacturer’s instructions on the bottle.

For boiled linseed oil, rub the oil vigorously into the stock with the heel of the hand, creating heat in the form of friction. This disperses the oil and prevents any build-ups in areas where you don’t want it, and pushes it into the grain of the wood.

Aim to avoid the chequering as much as possible with the oil. A small amount around the edges of the chequering is acceptable, but you don’t want to clog the chequering. It is hard to remove, and will attract grit and grime in the future. If the stock is lacquered, a wipe over with furniture wax or a silicon impregnated gun cloth will suffice.

Given all of the above, a synthetic stock is much easier to maintain. Bill Harriman in his excellent publication ‘Cleaning and Maintaining Modern and Antique Firearms’ recommends car dashboard and trim restorer, noting that this provides a protective film, restores colour and prevents fading.

One final check before we move away from the stock, is to ensure that, if you have a rifle with a free floating barrel, that it is indeed free floating. This can be easily done by slipping a sheet of paper between the barrel and the stock, and sliding it towards the action. The paper should go to at least within a few inches of where the barrel joins to the action. 

If it sticks at any point, you may need to loosen the stock screws and allow the barrel to relocate itself in the centre of the stock channel, before re-tightening the screws. If you are not confident in doing this, have a gunsmith take a look at the rifle, as in extreme cases the barrel channel may need opened slightly.

Barrel – deep clean or quick clean?

The barrel is one of its most important components when undertaking rifle care. It is what imparts the spin on the bullet and guides it towards the target. There are two schools of thought on how one should care for a rifle barrel effectively. 

The first is that the barrel should only be cleaned when it begins to lose accuracy. This type of owner (one would hope) cleans the barrel when they arrive home from their day in the field – or maybe even in the field – by perhaps pulling a boresnake type cleaner through their barrel a few times. 

This will remove any moisture present, and will remove most of the carbon too, provided the owner hasn’t spent a full day shooting targets on a range. It is perfectly adequate for someone who has fired one or two shots from their rifle and wants to remove moisture and carbon from the barrel. 

A spray of gun oil on the thick ‘mop’ part of the boresnake will leave a protective film of oil in the barrel to prevent corrosion.

The barrel should always be cleaned breech to muzzle using this method, and it is crucial that the boresnake is pulled straight out of the muzzle. The string must not be pulled at an angle against the crown (the front edge of the barrel). 

If a full (deep) clean of the barrel is preferred, the following items will be required:

  • Cleaning rod either carbon fibre or plastic covered steel (2 rods are preferable)
  • Suitable jag and plastic bristled bore brush
  • Carbon remover
  • Copper solvent
  • Cleaning patches suitable for the calibre
  • 4×2 cloth
  • Bore guide
  • Gun cleaning cradle
  • Nitrile gloves

1. Place the rifle in the cradle, with the breech slightly higher than the muzzle, if possible. This will mean that any bore solvents will not run back into the chamber if left in the barrel.

2. Insert the bore guide in the chamber, and screw the plastic brush onto the rod. 

3. Soak this with carbon remover and run it through the bore. Remove the brush from the rod and withdraw it back through the barrel. 

4. Repeat this a number of times, until the brush feels like its gliding smoothly through the barrel. Never pull a rod or jag back through the barrel, as there may be a chance that the crown may be damaged in doing so. If this happens, it will need the attention of a gunsmith. 

5. Leave the carbon remover to work, as per the manufacturer’s instructions, before refitting the jag and pushing a dry patch through the barrel. The patch will be black from having removed the carbon deposits. 

6. Repeat the process with the brush and then the patch. On the second or third patch, there should be practically no carbon showing. The gun should now have no carbon remaining in the barrel, only copper.

7. Fit the brush to the rod again and wet liberally with your chosen copper solvent.

8. Push this through the barrel until it exits the muzzle, and again remove the brush. 

9. Repeat this several times, leaving the bore for a few minutes in between to allow the solvent to work. 

10. Fit the jag to the rod again and push a clean, dry patch through the bore. The patch should now be showing some blue marking on exiting the muzzle. This is dissolved copper.

11. Repeat the copper process to ensure that all copper has been removed, and until the patches emerge from the barrel as clean as they went in! When this is achieved, place a small amount of gun oil on a patch or a wool mop if available, and run this through the bore once. This will help to prevent corrosion when the gun is laid up during the summer.

12. Remember to run a dry patch through the rifle before the start of the season to remove any oil deposits. In extreme cases, this oil can cause chamber pressures to climb excessively upon firing after a period of storage, and will certainly affect ‘cold bore’ accuracy.

Moderator threads and crown

Before leaving the barrel, it is important to stress the requirement to clean the face of the crown – that is, the angled front face of the barrel.

It is important that this area remains free of damage and is protected during storage and transportation. A rifle with a damaged crown will never be accurate and will require the crown to be re-cut by a gunsmith, at some considerable expense to the owner.

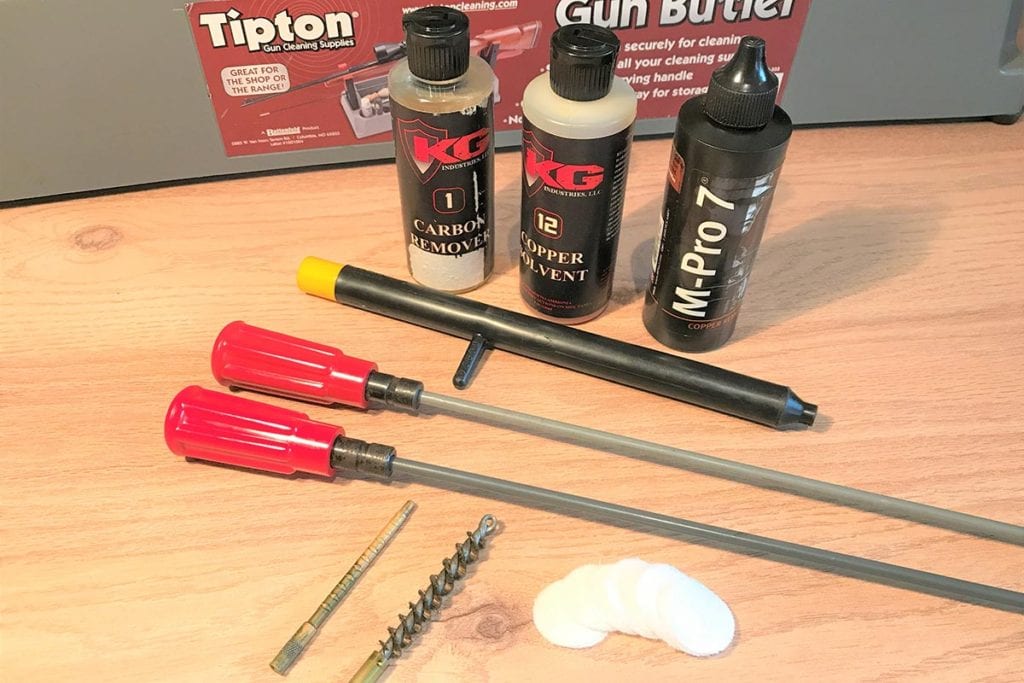
Simply take some 4×2 cloth with a small amount of carbon remover and give the crown a wipe in a circular motion. Using the thumb to press the cloth against the face of the barrel. Do not use any tools to clean the crown. 

We all know that moderators should be removed after use, but sometimes the threads on the rifle can be neglected, with a thread protector being fitted and the thread forgotten about. It is worth making cleaning the threads as much a part of your cleaning regime as cleaning the barrel. 

If the thread in the moderator picks up a small piece of debris, it could do massive damage to the thread. For this reason, it is worth cleaning the thread with some 4×2 cloth and a small drop of carbon remover, as the threads invariably get contaminated during the firing cycle.

After cleaning with the solvent, dry completely, and repeat the cleaning on the inside of the thread protector and the moderator threads if you can reach them (not so easy with reflex or ‘over barrel’ type moderators. A very small amount of anti-seize (copper) grease can be applied to the threads. 

To give an indication of how little grease is required, a cotton bud smeared with copper grease and drawn once across the top of the threads will deposit more than enough grease to the threads. As with the stock – less is more. 

When replacing the thread protector, leave it slightly loose, there is no need to tighten it up against the shoulder of the barrel, as any cleaning agent left on the threads will make it very hard to remove the cap in the future.

Telescopic sight

Looking after your scope is essential – after all, if you can’t see your quarry, you can’t shoot it! At the end of the season, take a good look inside your scope.

This may seem strange to most, as we’re so used to looking through our scopes. Have a look at the lenses, both through the objective (front) and the ocular (rear) bells using a torch to see into all areas. 

Have a look for anything that doesn’t look right. This may be in the form of algae or what looks like a spider’s web on the internal lenses. This would point to a minute amount of damp or condensation finding its way into the scope. 

Remember these scopes have been assembled in a clean room under laboratory conditions, so the only thing that should be present inside a scope is nitrogen gas. If the seals become compromised and the nitrogen gets out, then moisture will almost certainly find its way in.

If you do find anything untoward, contact the scope manufacturer, or an independent who specialises in scope repairs, and arrange to have it looked at and serviced. It may cost a lot less then you think to have this carried out.

If everything looks good, check the outside of the lenses for contamination. Shake off any loose debris, followed by a brush with a photographer’s lens brush. 

Do this with the lens that you’re brushing pointing towards the floor, to allow gravity to assist the debris to fall away. Only when all the loose debris has been removed should you proceed to using a lens cloth.

Do not use any chemicals other than liquid designed specifically for the purpose of lens cleaning, as this may damage the delicate coatings applied during manufacture to assist with the clarity and light transmission of your scope.

With the lenses cleaned, give the elevation and windage turrets a wiggle to check that they’re secure. Check that the clicks are can be heard and felt, which ensures the turret wont move unexpectedly. Similarly, check that the ocular adjustment on the rear of the scope is not loose, if it’s the type that is secured by a locking ring.

If your scope has an illuminated reticle, change the battery that powers the illumination. Some scopes have a spare tucked away in the turret caps, so why not rotate these – put the spare into the scope and replace the spare with a new one. 

Check the screws on the rings to ensure everything is tight.

Some people are afraid of over-tightening scope rings and damaging the tube of the scope. This is a legitimate concern, and one way to minimise the chances of this is to use a torque wrench or screwdriver. 

Wheeler make excellent torque screwdrivers which are calibrated in the same units published by scope mount manufacturers.

Simply set the screwdriver to the required torque and it will let you know with a beep or a click when you’ve reached the desired setting. A cheaper alternative is to use an Allen key, but instead of enjoying the leverage afforded by the long handle, use the short side and tighten with thumb and index finger. 

This will prevent over-tightening, as the reduced mechanical advantage prevents too much torque being applied. 

Bolt

The bolt face should be inspected for pitting and gas cutting from overpressure rounds or pierced primers. 

Give it a good clean with the corner of a cloth. Do not apply oil directly to the bolt face, as some will invariably find its way through the firing pin hole and into the firing pin spring. 

This should be avoided, as this area should remain free from oil or grease. Check the extractor claw for chips or wear – a jeweller’s loupe is useful for this to magnify the area. 

The bolt can be de-cocked to take the pressure off the firing pin, but it is important to stress that this should only be done if you’re confident that you’ll be able to re-cock it. A minority of manufacturers supply a de-cocking tool with their rifles, which is very useful.

If it has been possible to de-cock the bolt, check the end of the firing pin for chips or ‘cratering’. Cratering is caused by a pierced primer, which may be experienced very occasionally. 

The burn of the primer and the powder is so fierce upon ignition, that it literally burns a very small crater in the tip of the firing pin. The jeweller’s loupe is again ideal for this. 

If cratering of the firing pin is noticed, it is advisable to seek the advice of a gunsmith, as this may lead to problems in the future with possible misfires. The pin may be able to be re-profiled, so shouldn’t be an expensive fix. 

Magazine

Magazines come in many forms, with glass reinforced polymer being increasingly popular. 

Notwithstanding the issues with wear on the feed lips of these types, they are quite resilient and tend to spring back into shape if dropped or otherwise mis-handled, unlike steel ones which may suffer more serious problems in such a situation. 

Magazines, like firing pins, should not be lubricated. Given the amount of time that they spend in coat pockets, they would immediately attract dust and debris if lubricant was present.

Keep them clean and be sure to remove the rounds at the end of every trip, to prevent the follower spring from taking a ‘set’ which in layman’s terms means where it has been in a compressed state and wants to stay that way. This may lead to ammunition feed issues.

Any further cleaning would require the rifle to be removed from its stock.This is simply done by the removal of the stock retaining screws. 

If you decide to go down this route, it is essential to ensure that the rifle is fitted properly again into the stock, especially around the area of the recoil lug. 

Moderator

Modern moderators have come a long way since the days when they were destined to rot from the first time they were used. They now use all types of non-ferrous materials in their construction, which extends their life and ultimately make them a far more value for money product. 

There are a few things that can be done to maximise the life of a moderator. Each time after they’re used, give the inside of the moderator a quick spray with a water dispersing spray – WD40 or GT85 are ideal.

Place the moderator on top of a warm radiator while you clean your rifle to allow any moisture to evaporate. 

At the end of the season, if the moderator can be dismantled, take it apart and have a look around where the moderator separates. Look for damage to the threads caused by hot gasses cutting the steel, and seek the advice of a gunsmith if the moderator is showing signs of wear in this area. 

The last thing to check is that your trigger unit and safety catch are fully functional.

First of all, check that the rifle is not loaded. Insert the bolt in the rifle and close it as if to take a shot. Next, apply the safety catch and pull the trigger. The rifle should not fire.

Now place the safety catch to the fire position. Pull the trigger and this time you should hear a click as the sear drops and allows the firing pin to go forward. 

Repeat the above several times to ensure that the trigger and safety catch are fully functional. If there are any issues with either the safety catch or the trigger, have the rifle examined by a competent gunsmith.

Finally, a wipe over all of the external surfaces with an oily rag concludes the rifle care. It should be ready to be stored for the summer, with you safe in the knowledge that it will be ready for all that a new season has to throw at it. 

BASC’s Director of Firearms, Bill Harriman, recently released a book entitled ‘Cleaning and Maintaining Modern and Antique Firearms’ which is an excellent reference for anyone who is unsure about how best to care for their firearms. It is available through the BASC online book shop on our website.

Published by Quiller and available to BASC members at a discounted priced of £12.95

With the season over and most shooters now finding they have time on their hands, it’s a good opportunity for a spot of maintenance on your guns. BASC director of firearms Bill Harriman shows you how.

Get the latest updates from BASC


You can unsubscribe at any time by clicking the link in the footer of our emails. For information about our privacy practices, please visit our website.

* indicates required